Back in January I decided to redecorate my entire living room and instead of a new coffee table, I ended up drawn to a WWII-era Chinese Camphor Chest.
I found the chest at Adjective’s Unhinged. If you live in Orlando and don’t know about Adjective’s Marketplace, then you are truly missing out. This place is magical. It’s like an antique mall + every DIY furniture/knickknack makeover from Pinterest EVER. It’s amazing.
Adjective’s Marketplace has finished pieces that have been re-done by professionals. It’s where I got the bedside tables for both my bedroom and guestroom.

Adjective’s Unhinged is where the Adjective’s vendors sell pieces that they haven’t Pinterest-fied yet. As a consumer you can buy a piece and take it home, as-is. Or you can buy a piece and have the vendors re-finish it to your specifications. The Choose Your Own Adventure of antiques shopping.
I saw this trunk and – before doing any research on what the heck it was or putting together any plan of attack for refinishing it – purchased it and had Vince + Kellan pick it up for me.

So it came home and the research began. Not only did I find out that it’s WWII-era, but I learned that these chests are extremely common, range widely in quality, and absolutely NO two are alike though some are very similar to one another.
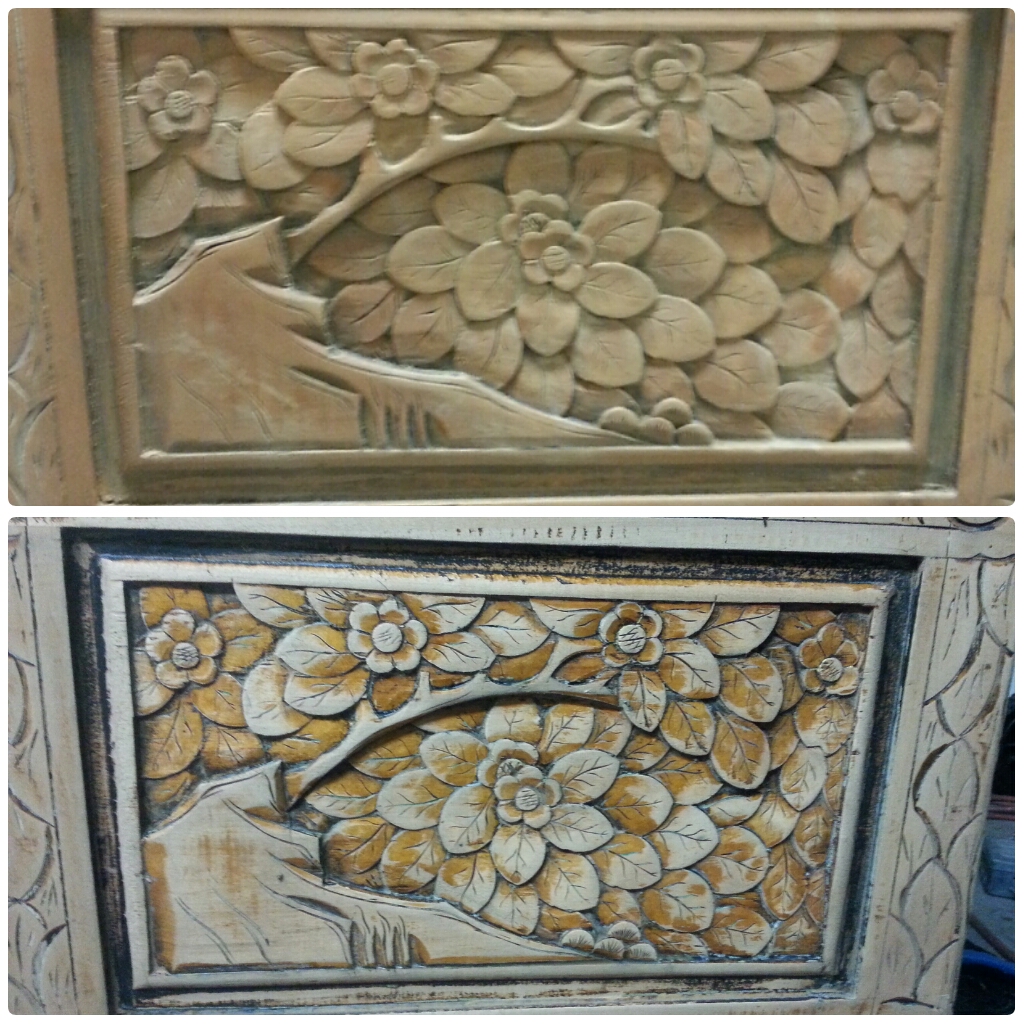
Each chest is hand-carved and was originally stained and varnished with a high gloss. Mine is middle-of-the-road quality, and originally it probably likely looked like this:

By the time I got to it, my chest had been stripped of most of the varnish, painted a weird combination of bright blue and yellow, then mostly stripped again and painted over completely in that odd pink…. of course I had no idea of any of this when I bought it. I just knew I HAD to have it.
Like, the urge to own this chest, the love I feel upon looking at it, is so strong that I wonder if it were mine in a past life or something.

I started working on it by chipping paint off with an exacto knife. And it was NOT hard. The paint was so thick, and the carvings so intricate, that I spent hour upon hour hunched over the trunk in our garage chipping away to reveal detail and relief.
After I got nearly the entire lid chipped away of major paint chunks, we debated for probably two months on what the next step should be. Vince highly recommended media blasting the trunk with a soft media like walnut. But that ish is EXPENSIVE. So we kept putting it on hold.
Finally, Vince was out of town (and thus unable to prevent any rash decisions on my part) and I wanted the trunk done (I’m impatient and figured I either fix it and enjoy it or destroy it and have at least tried) so I decided to take a risk on good ol’ fashioned paint stripper.
I tried to research how Camphor Wood would handle paint stripper – pretty much zero help on the internet. With the help of my friendly Home Depot paint guy, I settled on an ‘eco-friendly’ paint stripper that would hopefully not be too harsh.
I started with a bottom corner of a side panel. Within 5 minutes I ended up doing the entire side.
The sides were pretty easy because whoever had given this trunk it’s previous treatments didn’t seem to care too much about the side panels. I took the paint off and realized a lot of original varnish was still there, and it was this gorgeous golden color.
So I moved on to the back panel.

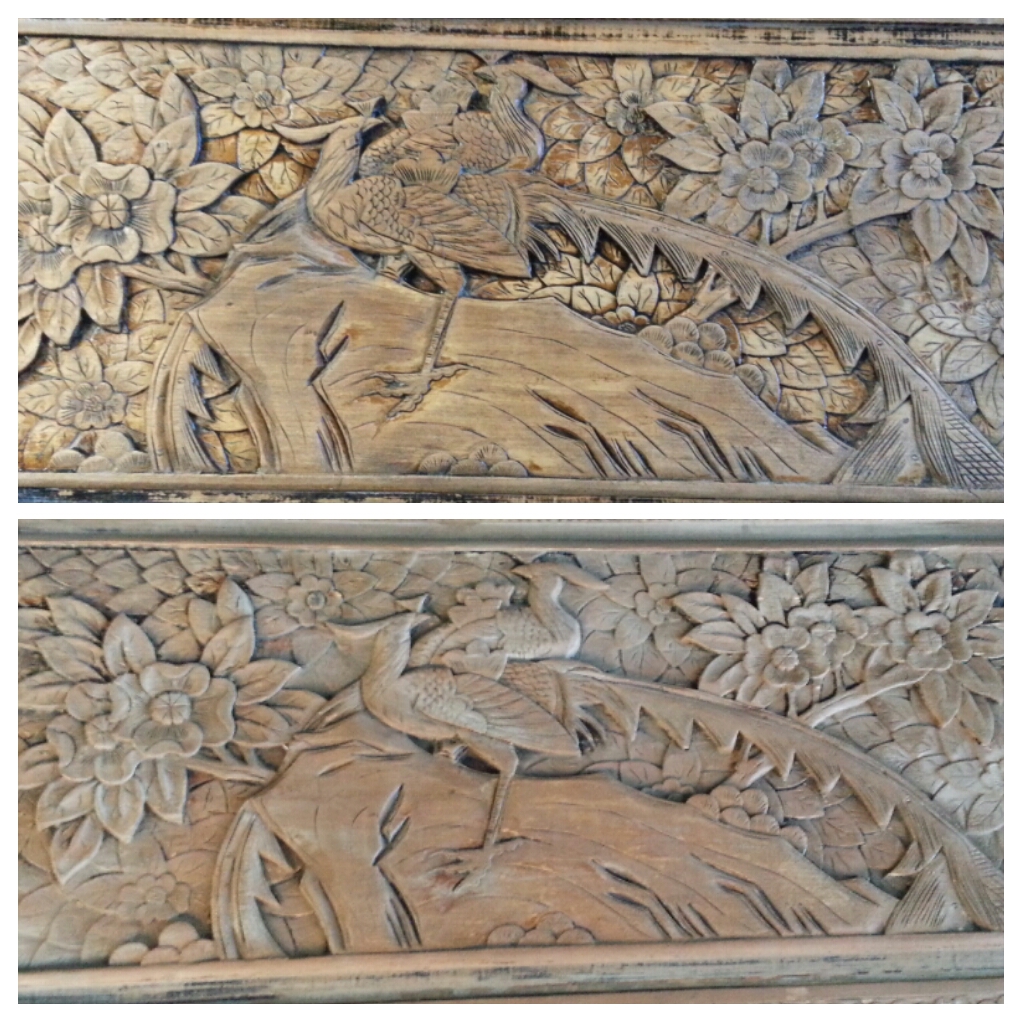
Holy. Crap. Dat detail doe. The eagle is unflippin’ believable with all that detail. And the flowers! I just kept brushing the paint stripper on and dipping my brush in water to swirl it around and off. And the more I brushed, the more detail was revealed. I ended up taking the hose to the trunk to wash all the stripper off and using Vince’s air compressor to blow dry it.
By the time I got to the top, I had this down to a science. I figured the top would go the easiest since I’d spent the most time digging out chunks of paint from the details, and it did.

At this point I’ve gotten 95% of the paint off of the trunk. There are still remnants of blue and yellow tucked into the crevasses. There is still weird pink on the top and feet.
Next steps are for me to hit it one more time with paint stripper and then a gentle cleaner. After I hose it down and let it dry, I’ve decided to take one of two routes:
- Coat it with three thin layers of UV Polyurethane to give it a ‘wet’ look, which is really when the wood shines.
- Stain it a golden color all over and then poly it.
I’m still not sure which I want to do just yet but once that’s figured out I’ll get glass cut for the top and it will be officially done!
For now, it’s found the perfect space in my front room between two accent chairs whose flower pattern matches WAY too well for me to believe my subconscious wasn’t involved. While the chest may not be done in its make-over process yet, it’s perfect and loved as is. 🙂

This beautiful, my camphor chest is very similar, and I have just discovered a small split in the wood of one corner. I am thinking that I will fill it with camphor oil and hopefully the wood will swell enough to save me having to do any more major work.
Regards,
Sally
Thank you Sally!
Where did you get your camphor chest? Do you blog or have any photos to share? I would love to see how someone else is doing theirs. My blog gets a lot of traffic to this page and I realized it’s because there is such little information out there on restoring these beautiful chests, and even less photos.
The wood is pretty soft and there have been some “patches” made in the corners of mine long before I found it. I think that may be why someone painted over it so many times… but regardless, it’s beautiful to me! Would love to see yours!
Just bought a camphor chest. Didn’t know what I was buying, it just looked really nice and I had to have it. The people who sold it to me “restored” it by painting it with flat black paint. After finding out that their refinishing was a mistake and that they should have left it alone, I am now wanting to restore the chest to what it was meant to look like. Alicia, from everything you have learned from restoring your camphor chest, please give me guidance on how I should start and what I should use. Thanks.
Hi Maria! That’s awesome that you got a chest and you didn’t know what it was – I think I did exactly the same thing! I found a very light paint thinner that was a gel-like consistency at Lowes or Home Depot and painted it on with a really thick paint brush. As I painted this gel-like substance on the chest, I kind of swirled the brushes into the detail of the chest. I noticed the brush and gel were turning the color of the pink paint and so I kept swirling… eventually I noticed the color of the original wood underneath. I kept a tin of water nearby and kept wetting the paint brush after the gel did it’s magic, so I was really kind of cleaning the paint off after the gel took effect.
I would start with a light paint thinner, personally. You can always get more intense if the paint is being stubborn. The key is getting a nice, thick paint brush to put the paint thinner on with. Don’t be afraid of getting the chest wet with water – camphor is an amazing wood and can get wet and will dry nicely. Let me know if you have any other questions! I’d love to see photos of yours as you go!
Hi.i am trying to find out what colour stain or oil was used on the chests…mine is a ned dark color with a lightish top…???thanks
I have a small chest that is 19 inches long 9 inches wide and 12 inches high. It was very dirty and marked up. I was just going to clean it up with tsp and paint it but changed my mind when I saw how beautiful it was. I left the detailed insets alone & used Circa 1850 furniture stripper on the rest of it using steel wool. I sanded it & am now applying a semi-gloss polyurathane to it. it is beautiful.
Great tips on camphor chests – I will post some pics of mine – not sure what I want to do with 1 of them – I have 3! One my mum gave me as a gift, it is unfinished and I have always enjoyed it that way….the two others came from the home of my inlaws – they are asian – I didn’t even know she had any, her house was so full of stuff, I had never seen them, found them underneath piles of clothes when I emptied the house. I was thinking of using 2 of them a the foot of twin beds – but it would mean staining my unstained one – cannot make up my mind – will post some pics tomorrow. Great blog!
My father bought one for my mother during his time in the Navy during the Korean War. He sent the chest home with an engagement ring in it! I now have it. It’s never been painted but it needs to be refinished. I found you when researching what to do. Thanks for posting!
Thank you so much for posting! Today my Mother gifted me this https://drive.google.com/file/d/1DZEy_WXhnlk4hGIA-5aZCGZM0X-RsqZ4/view?usp=drivesdk camphor chest, and I’m so excited to begin restoring it to its original state. Just a little history. The chest was a gift to my Grandmother from my grandfather who was in the Navy and stationed at Peral Harbor. While inspecting the chest it I found a handwritten message on the bottom of the chest from my Grandfather that reads: “June, I had a helluva time getting this shipped out of Honalulu to Lodi, CA Oct. 41 – Love, Edward.”
Thank you again for the DIY I’m truly grateful!
Hey Alicia,
I have a very similiar Trunk, supposidely my greatfather brought it back while he was a Merchant Marine! I am curious, is there anyway to restore the camphor smell to the wood? Should I just soak the inside with Camphor oil and hope for the best???
ALso, were these Trunks generally Painted? What is the best way to give it the “waxy” look???
I will post some pics when I get it cleaned!
Thanks!
Jeff G
Hello,
thank you for this article/post and that your chest is beautiful.
i have a camphor wood chest. Its been in my family as far back as i can remeber. I had no knowledge of anything in regards to their origins, or anything. I came across this post, searching for info on how to repair it. The wood that secured one of the lid hinges, was broken off long ago, and so ive just been extremely delicate with it and rarely open it.
Its in its original condition. Never molested.
Ive used that red n white aerosol can wood oil/cleaner. (Liquid Gold?)
I just noticed the (tab n slot?) Rear corner joint on the lid is needing to be reset and re-glued.
So glad i found this article.
I wish i could include a picture.
OMG I just saw this comment far, far too late as it ended up in Spam but THAT CHEST IS GORGEOUS!!! I LOVE the inscription and that is so special!! THANK YOU SO MUCH FOR SHARING!!!!
I inherited my grandmother’s camphor wedding chest, which is well over 100 years old now. The wood was all dried out. Every few days, I took a paint brush with Howard’s Feed ‘n Wax, which I got at Home Depot. I let it sit several hours, then wiped the excess off. Occasionally, I would also do a coat of Howard’s Orange Oil. After a couple months, it’s absolutely beautiful again. It gets a very nice natural sheen from the wax vs. an unnatural gloss from polyurethane. Now I just maintain it with Feed ‘n Wax. I did the same thing with a small carved camphor box.
Hi. Love reading your journey restoring this piece the the comments people have left. For my Grandmother, a camphor chest was a sign of wealth and she could never afford one. My mother bought hers in Zhong Kong in 1970. But the great thing about these chests is the camphor – moths, silverfish and the like hate camphor so a great place to store woollen and precious items such as wedding dresses, paisley shawls, etc. I just bought a dark coloured one and was going to ‘patch it up’ but after reading this I think I’ll take time and do it properly. I often wonder if the carvings are based on a story/folklore. Maybe I should just make my own up – thanks for sharing everyone 😁
Hi I have just inherited my Mothers beautiful Camohor Wood chest. A thing if beauty for sure and a piece I have always admired. Sadly it has been scalded in too possibly by a hot drink as Dad was almost blind before he died last December.
Also it has lost some if it’s camphor smell. I have ordered 50 ml bottle if camphor oil but don’t know the best way to restore it.
I can possibly live with the scald marks.
I am thinking of renovating my grandfather’s camphor chest. He was a marine engineer sailing out of Liverpool, UK, on the Far East run, Including Shanghai, Hong Kong and Yokohama during the 1920s and 1930s. These chests were used to transport belongings and gifts back home. Their shape meant they could be stacked in the ship’s hold and packed in side by side. The chest is a bit battered now. It still has the distinctive camphor smell which makes it excellent for storing precious wool and cashmere garments as it deters clothes moths. Thank you for all the practical and helpful advice.